Friday, June 20, 2014

Crunchy Chopped Salad


I think this was originally a recipe from a South Beach Diet cookbook.  But I started making it so long ago, and have added and deleted ingredients over the years…so that I am not sure it’s the same one in the book.  That’s okay – it’s not about exact ingredients.  You can add or subtract as you like.  It’s about CRUNCH!  And that’s what you get in this Crunchy Chopped Salad!
I know that chips aren’t great for me.  I usually don’t crave them, and I make sure I don’t keep them in the house (because as a stay-at-home mom, you DO eat whatever is in the pantry!)  But sometimes you just get that urge for something kind of salty and crunchy.  I make this salad instead.  Is it the same?  Of course not!  (Otherwise I’d call it Doritos Salad!)  But this satisfying, fun-to-eat dish  scratches that itch for me, and maybe it will for you too.
If you need a break from lettuce, try this.  If you have lots of singleton vegetables in your crisper drawer, try this.  If you want something fresh and different for your next cookout, try this!
Crunchy Chopped Salad
(Serves four as a side dish)
Ingredients:
  • 6 baby carrots
  • 1 bunch radishes, trimmed
  • 3 stalks celery, trimmed
  • 2 Persian cucumbers, or one large cucumber
  • 1/2 red bell pepper
  • 1/2 yellow bell pepper
  • 2 green onions
  • 2 cloves garlic
  • juice of 1 lemon or lime
  • 2 or 3 drops of honey
  • salt and pepper
  • 1/4 to 1/3 cup olive oil
  • 2 avocados
Directions:
  1. Wash and trim all your veggies.  Cut them all into medium-small pieces.  This is up to you, but for example, I cut the peppers into 1/2″ square pieces.  The radishes, cucumbers, carrots, and celery all get sliced vertically, then cut into 1/4″ slices.  If you dice everything too small, you won’t get the crunchiness.  If you cut everything too large, you’ll only get one or two veggies on your spoon at a time.  Experiment and see what size you like best.  If you are using a large cucumber, you may want to peel off the waxy skin and scoop out the seeds.  I like Persians because they are thin-skinned and have very little squishy gel around the seeds.  Pile all your chopped veggies into a big bowl and toss.  Beautiful, right?
  2. In a little food processor, blend up your garlic, lemon juice, honey, salt and pepper, and 1/4 cup olive oil.  Taste and dilute with more oil if you like.
  3. To serve, dish the salad into a bowl and drizzle liberally with dressing.  For each serving, dice half of an avocado and place it on top (otherwise it gets smushed.)  Eat this salad with a big soup spoon so you get a little of each vegetable in every bite!
If you have leftovers, you can mix in a can of tuna the next day.  It’s wonderful!

Cranberry Orange Scones


If you have kids, you probably know what summer break is like:  trying to keep them busy and entertained without letting their brains turn to mush!  One of my favorite ways to do that is baking together.    I have my older girl (first grader now!) read the recipe out loud, and both girls love to stir and mix and pour ingredients.  Today’s group baking exercise?  Cranberry Orange Scones!
These are gluten-free, made with coconut flour.  If you’ve never tried it, I can’t recommend it highly enough.  For six big scones, you only need half a cup of coconut flour!  I like making treats for the girls that are single serving – that way there’s no arguing over whether the slice of bread is big enough, or having to share the last one.  These came together in a snap.  I made some changes, but the original recipe (found on the Elana’s Pantry website) directs you to mix all the ingredients in a food processor, and I’m sure that would have made the recipe go even faster!  But because my girls wanted to help, we mixed them by hand – dry ingredients in a large bowl, wet ingredients in a smaller bowl, and then mixed wet into dry.
Try these little heaven-scented beauties today!
Cranberry Orange Scones 
(Gluten-Free)     makes six large scones
Ingredients:
  • 1/2 cup coconut flour
  • 1/4 teaspoon salt
  • 1/4 teaspoon baking soda
  • 1/4 cup coconut oil or softened butter
  • 1/4 cup honey
  • 4 eggs
  • 1/2 cup dried sweetened cranberries
  • zest of one orange, plus the juice of half the orange
Directions:
  1. In a large bowl, blend together the flour, salt, and baking soda.
  2. In another bowl, beat together the coconut oil or butter, honey, and eggs.
  3. Mix the egg mixture into the flour mixture.  Stir in the cranberries, orange zest, and orange juice.
  4. On a Silpat mat or parchment paper, make six mounds of dough.
  5. Bake for about 15 minutes at 350*F.

Saturday, June 7, 2014

Crockpot Chicken Curry and Curry Chicken Stew


Two for the price of one!  That’s what you get when you start this recipe in the crockpot.  It’s not very glamorous, but oh boy! does it smell and taste divine!  A simple list of ingredients  and a crockpot are all you need to make two delicious meals: Crockpot Curry Chicken and Curry Chicken Stew!
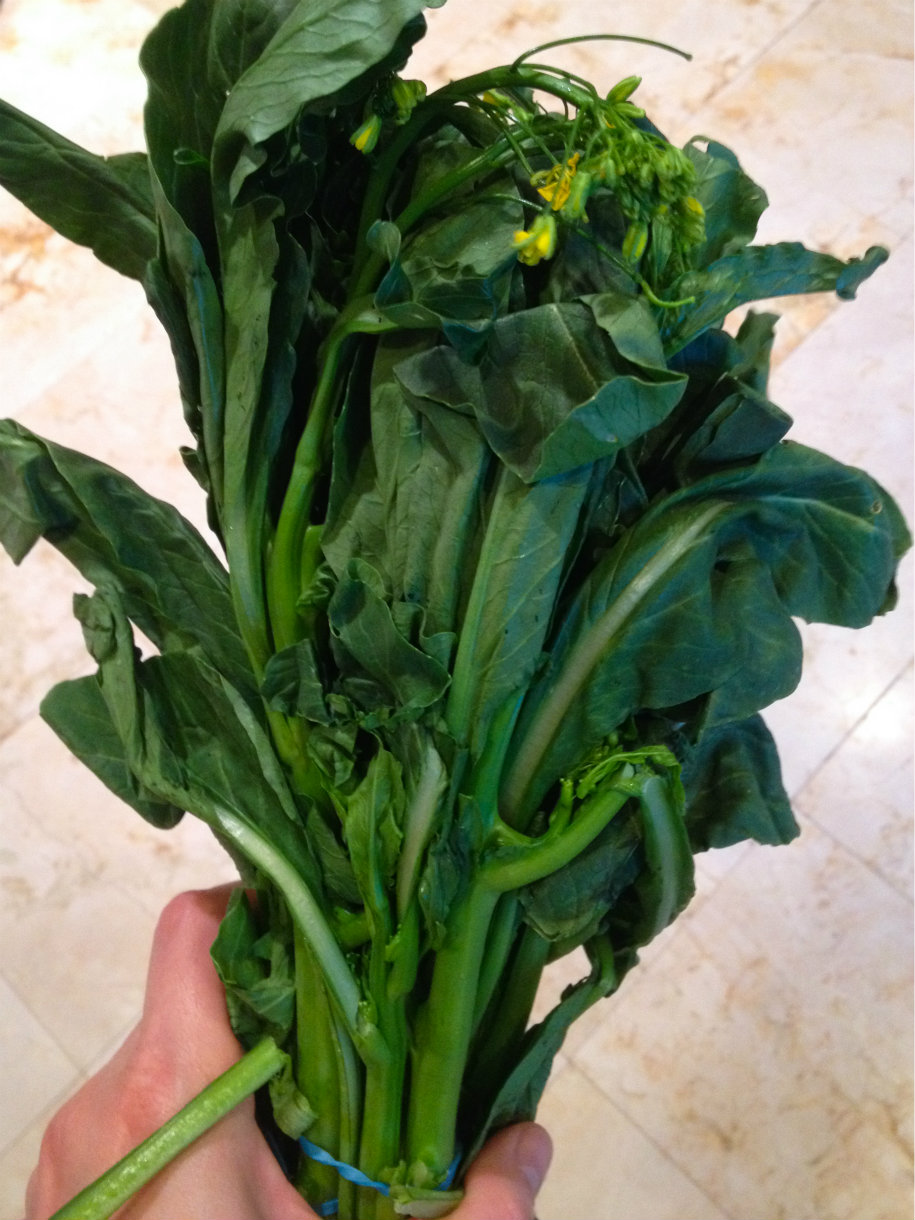
First you need a can of coconut milk or coconut cream.  It needs to be a can, because the coconut milk “beverage” they put in cartons is all watery, and you need the high fat content of the canned stuff.  Trader Joe’s has both canned coconut milk and coconut cream, or you can try an Asian market or online.  Next thing you need is curry.  You can use curry paste; I just used curry powder and it was lovely.  You’ll need an 8-ounce package of mushrooms, any kind – I used regular button mushrooms, but shiitakes or creminis would be nice too, and give it a stronger flavor.  And last is this beauty:
Chinese Broccoli resize
I buy it at the farmer’s market from a Vietnamese lady who tells me it’s called “Chinese broccoli”.  A little online research shows its real name is kai lan.  Its leaves are like spinach, and its cooked stems have the consistency of asparagus.  If you can’t find it, use spinach instead…although the Chinese broccoli has a stronger, more bitter flavor.
I made this with whole chicken legs – skin, bones and all – but I think next time I’ll try it with just boneless, skinless thighs.  Chicken skin in the crockpot is not a nice thing – we actually peeled it off before we ate the Curry Chicken the first night because it just seemed kind of rubbery.  But I think the skin and bones do add to the stock for the stew the next day, so it’s up to you.  Either way, you get two healthy, delicious meals out of one crockpot – you can’t beat that!
Crockpot Curry Chicken
Ingredients:
  • 3 pounds whole chicken legs
  • 1 can of coconut cream, or use coconut milk (not low-fat)
  • 3 tablespoons curry powder or curry paste of your choice
  • juice of 1 lemon or lime
  • 1 tablespoon salt
Directions:
  1. In a large crockpot, set the time for 8 hours on low or 4-6 on high.  Put the chicken legs on the bottom.
  2. Mix together the coconut cream, curry, lemon juice and salt.  Pour over the chicken and stir to combine.
  3. Cook until a thermometer reads 180*F.  Remove chicken legs from the pot and cover them with foil.  Pour the coconut broth into a large pan and simmer for about 15 minutes.  It will reduce a little.  Serve chicken legs with coconut broth.
Now, at this point, I had 2 very large legs leftover and about a cup of coconut broth.  I put them together in a Tupperware container.  Then the next day, I made…
Curry Chicken Stew
Ingredients:
  • 1 tablespoon butter, coconut oil or olive oil
  • 8 ounces mushrooms, quartered
  • 1 pound Chinese broccoli, cut into 2-inch pieces  (or use fresh spinach)
  • 2 large cooked chicken legs (or use 1 pound of chicken thighs)
  • leftover coconut broth – as much as you have
  • optional chicken broth
  • optional jasmine rice to serve
Directions:
  1. In a large pan, saute the mushrooms in 1 tablespoon butter, coconut oil, or olive oil.  Stir, and after five minutes, add the Chinese broccoli and cover.
  2. While the mushrooms are cooking, prepare the chicken:  peel off the skin and any subcutaneous fat you find from the cooked chicken legs.  Remove the meat from the bones and roughly chop.
  3. Add the chopped chicken and remaining coconut broth to the mushrooms and Chinese broccoli.  If you want it to be soupier, add some chicken broth.  Cook until the chicken is hot, about ten minutes.
This would be lovely with some steamed jasmine rice!  I ate this for lunch, and liked it so much I ate it again for breakfast.

Sunday, May 4, 2014

Samson's Carrot Cookies


For Christmas, I got my kindergartner The Disney Princess Cookbook, and I’m so happy I did!  With pretty princesses on every page, it features real recipes (and not just cake mix plus applesauce-type concoctions) that are great for parents and kids to make together.  I have her read the recipes, and she’s learning about following directions, measurements, and even fractions!  We’ve made a few things from her cookbook, but the one we like best is Samson’s Carrot Cookies.
Samson, if you don’t know, is the name of Prince Phillip’s horse in “Sleeping Beauty.”  These cookies are soft and cake-like, with carrots, apples, and cranberries.  (We omitted the walnuts since my girl is allergic, but I know they’d be delicious!)   These make great bribes for little girls who stay in their beds all night, too.  (Yep… guilty!)   Try them this weekend with your favorite little prince or princess.
Disney Princess Cookbook resize
Samson’s Carrot Cookies
(from The Disney Princess Cookbook)
Ingredients:
  • 1 cup flour
  • 1 teaspoon baking powder
  • 1/2 teaspoon salt
  • 1/2 teaspoon cinnamon
  • 1/2 teaspoon nutmeg
  • (we added 1/2 teaspoon ground ginger.  It’s not in the recipe but it was a lovely addition)
  • 1/2 cup brown sugar
  • 1/4 cup melted butter
  • 1 egg, lightly beaten
  • 1 cup rolled oats
  • 1 cup shredded carrot
  • 1/2 cup shredded apple
  • 1/2 cup chopped walnuts
  • 1/3 cup dried cranberries (raisins would work too)
Directions:
  1. Heat the oven to 375*F.  Line a cookie sheet with parchment paper.
  2. In a small bowl, whisk together the flour, baking powder, salt, cinnamon,  nutmeg, and ground ginger.
  3. In a large bowl, whisk together the brown sugar and melted butter.  Then beat in the egg with a fork.
  4. Stir the flour mixture into the sugar mixture until the batter is smooth.  Then stir in the oats, shredded carrot and apple, walnuts, and dried cranberries.
  5. Drop rounded tablespoons of batter onto the cookie sheet, spacing them about 1/2 inch apart.
  6. Bake the cookies until they just begin to turn golden brown on top, about 8 minutes.  (NOTE: The recipe says ’8 minutes’, but I found 12 minutes was more like it in my oven.  Let’s say check at 8 minutes, but be prepared for 4-5 more!)  Leave them on the baking sheet for 2 minutes before moving them to a wire rack to cool.

Laurie Samson's Carrot Cookie resize
Hey Mom, I stole another cookie off the counter while you were writing your blog! Want a bite?

Saturday, April 26, 2014

Crustless Kale Quiche


Talk about a tongue twister!  It’s worth the effort to say, and the little bit to make, because this Crustless Kale Quiche hits the spot.
I’ve only made this once … and I’ve already eaten almost half of it.  The kale adds a little bitterness and chew to what would otherwise be a run-of-the-mill spinach pie.  Nutmeg, currants, and pepitas add an almost sweet, Middle Eastern flavor profile.  The three eggs are just enough to combine the ingredients without becoming heavy or custardy like a regular spinach quiche.  Don’t get me wrong – a traditional spinach and swiss cheese quiche is wonderful, but this one is lighter, with an unexpected combination of flavors that will have you craving it again.
I ate this hot, and I ate it cold, cut right out of the fridge.  I ate this with a big slab of goat cheese on top and I ate it plain.  I’m going to eat more of it with dinner tonight and see if I can’t discover some new way to enjoy it.  If you want your greens, with a little extra zing, try this instead of a salad tonight!
Crustless Kale Quiche
Ingredients:
  • 1 pound bag of frozen chopped spinach
  • 1 large bunch of kale
  • 3/4 cup pepitas (or try pine nuts or sunflower seeds)
  • 1 tablespoon coconut oil (or butter) plus more for greasing the pie plate
  • 1 teaspoon chopped garlic (about 2 cloves)
  • 1/2 cup currants or raisins (next time I’m trying golden raisins!)
  • 1/8 teaspoon ground nutmeg
  • 1/2 teaspoon salt
  • 3 eggs
  • Goat cheese, to serve, if desired
Directions:
  1. Wash the kale and remove from the stem, tearing it into smaller-than-bite-sized pieces.  Saute on medium heat in a large pot with a lid.  Don’t add any extra water or oil – just the damp kale by itself.  Stir occasionally until it gets soft, about 15 minutes.  When it appears soft and has reduced in volume, pour in the bag of frozen spinach.  Stir to combine and replace the lid.  Cook on medium-low for another five minutes until the spinach is thawed.  Remove from the heat and let cool.
  2. Preheat the oven to 350*F.  While the spinach and kale are cooling, heat the coconut oil over medium and add the pepitas.  Stir frequently for 5 minutes, then add the garlic and currants.  Stir for another 3 minutes.
  3. Squeeze out as much water from the kale mixture as possible, then dump it into a large bowl.  Pour over the pepita mixture and combine.  Add nutmeg and salt.
  4. Beat 3 eggs well and mix into kale mixture.  Grease a pie plate, then fill with the kale mixture.  Smooth it down so you have a flat top.  Bake for 35 minutes or until not wet in the middle.  Serve warm or cold, with goat cheese or without.

Sweet Pea Soup


I call both of my girls “Sweet Pea.”  My Mom called me “Sweet Pea” too.   So when I was working on a recipe to use up the last of my buttermilk and stumbled on this tempting combination of peas and mint, I couldn’t help but give it a cute name:  Sweet Pea Soup!
Peas and mint are a natural springtime match-up.  This soup comes together in half an hour, and with another half hour to chill,  it will be ready to eat.  I used both frozen peas and pea pods (which are all over my Farmer’s Market, and probably yours, too.)  If you can’t find pea pods, just double the frozen peas and use a full pound.  The recipe calls for you to strain the blended soup, which gives it a more silky, smooth texture.  You can skip this step if you are in a hurry, or if you like a little thicker body to your soup.  Either way I think you’ll love it, and so will all the “Sweet Pea’s” in your life!
Sweet Pea Soup
Ingredients:
  • 1 cup pea pods, any kind
  • 1 onion (sweet Vidalia would be nice, but I just used a regular white onion), chopped
  • 3 tablespoons butter
  • 8 ounces frozen peas
  • 2 cups chicken stock
  • 1 cup buttermilk
  • 1 handful mint leaves (save a few pretty ones for garnish)
  • salt to taste
Directions:
  1. In a large pot, heat the pea pods and onion in the butter.  Cook over medium heat for ten minutes until the onion is getting soft.
  2. Add the frozen peas and chicken stock.  Cook on medium for ten minutes.
  3. Turn off the heat.  Pour in buttermilk and mint.  Blend with an immersion blender, or transfer to a large blender and blend in batches until smooth.  Taste and add salt to your liking.
  4. Strain the soup through a mesh sieve (or not, your choice.)  Cool in the refrigerator for half an hour.  Serve chilled, with additional mint leaves for garnish.

Tzatziki Wrap


What a fun word to say:  Tzatziki!  With spring in full swing now, I am in love with using fresh herbs in as many ways possible.  This recipe for my Tzatziki Wrap uses a small handful of dill. Dill is a lovely thing to grow in a windowbox, if you can, or in your garden, because it goes with so many other flavors and cuisines.  If you have leftover dill after making the tzatziki, use it on fresh or smoked salmon.
Tzatziki is just a fancy way to say “yogurt dip.”   It is found in Greek and Mediterranean dishes, and goes well with all grilled meats—chicken, beef, lamb, salmon—as well as vegetarian dishes like falafel.  Blend this up in your food processor in five minutes, and enjoy for lunch or a light dinner tonight!
Tzatziki Wrap 
(Makes two wraps)
Ingredients:
  • 1/2 cup plain yogurt (Greek yogurt or regular.  Avoid nonfat as the texture is too runny)
  • 1 big handful dill sprigs, any tough parts trimmed away
  • juice of 1/2 lemon
  • salt and pepper
  • 1 teaspoon minced garlic
  • 1/2 large cucumber, peeled and seeded
  • 1/2 red bell pepper
  • 1/2 green bell pepper
  • 1 cup baby spinach, or a few leaves of romaine lettuce
  • 1 cooked chicken breast
  • tortillas or pita bread for wrapping
Directions:
  1. Make the tzatziki:  In a food processor or blender, blend the yogurt, dill, lemon juice, salt, pepper, and garlic together.  Cut the half a cucumber in half again, and add one half to the blender and combine.  (You should now have one-quarter of a cucumber left.  Math!)  Refrigerate the tzatziki until ready to use.
  2. Slice the peppers and cucumber into very fine strips.  If you are using romaine lettuce, wash and dry the leaves and stack them on a cutting board.  Cut the leaves into fine strips.  Mix the peppers, cucumber, and lettuce in a large bowl and toss to combine.
  3. Very thinly slice the chicken breast.  Prepare your tortilla or pita bread for filling.  (I always warm up tortillas in the microwave, covered with a damp paper towel, so they’re pliable and won’t break.)  Fill tortilla with chicken breast slices, vegetables, and a big drizzle of tzatziki.  Roll up and eat, with more tzatziki if you like.
  4. Cutting carbs, or do you have leftover wrap filling?  Toss with tzatziki and eat it like a salad!  It also goes great as a dip—try with carrots.