Showing posts with label Gluten-Free. Show all posts

Wednesday, February 1, 2017

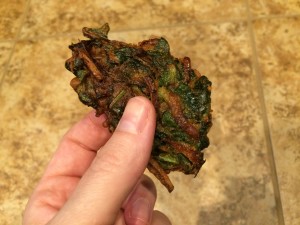
Spinach Pakoras with Royal Dip


I first had these delicious veggie fritters at a stand at the farmer’s market.  I’d never seen them before, but it was love at first bite!  I swore I’d have to find a way to make them at home – and I did!  Spinach Pakoras with Royal Dip are healthy, tasty, vegetarian and gluten-free too!  These Indian snacks are eaten with a minty yogurt dip and are a popular street food.

The only ingredient that may be a bit tough to find is chickpea flour.  Also called gram flour or besan flour, it’s just dried garbanzo beans ground powder-fine.  I made it at home, and while it took a bit of time because my food processor is wimpy, it worked very well!  If you do grind your own, you will need to sift it through a fine sieve, and return any pebbles to the food processor for a finer grind.  After that, it’s smooth sailing.  Bob's Red Mill has a really good packaged chickpea flour, and is available at most grocery stores.  If you’re lucky enough to have an Indian grocery store nearby, stop in and buy some chickpea flour – and whatever else catches your eye and tempts your nose!
Spinach Pakoras with Royal Dip

Ingredients:
  • 1 cup Greek yogurt
  • 1 clove garlic, finely minced
  • 1 tablespoon cilantro, finely minced
  • 1 tablespoon mint, finely minced
  • 1 cup chickpea flour
  • 1 teaspoon curry powder
  • 1/2 teaspoon  ground fennel seeds
  • 2 tablespoons rice flour (or use more chickpea flour, or use regular flour)
  • 2 cups fresh spinach or other hearty greens (mustard, collard, kale), chopped
  • 1/2 onion, cut into very thin strings
  • 1/4 teaspoon salt
  • 1/4 cup water (may use more or less)
  • oil for frying:  grapeseed, coconut, peanut, or vegetable oil
Directions:
  1. Make the Royal Dip:  stir together the yogurt, garlic, cilantro, and mint.  Cover and refrigerate.
  2. Mix together the chickpea flour, curry powder, fennel, and rice flour in a large bowl.
  3. Mix in the spinach and onion. Stir to combine.
  4. Add about 3 tablespoons of water and stir.  Mix it all very well.  You don’t want a thin batter – you just want the flour to be wet and coating the veggies.  Add a bit of water until you make a thick batter.
  5. Heat the oil over a medium burner and drop the pakora batter in by the tablespoonful.  Try to flatten them out a bit so they are pancake-shaped as opposed to spherical.  Cook for about 3 minutes until crispy, then flip and cook the other side.
  6. Remove pakoras to a paper towel-lined plate and sprinkle with a bit of salt.  Serve hot with the Royal Dip.


Friday, January 27, 2017

Apple Spice Baked Oatmeal


I have returned!  It’s a new year, and I’ve decided to make a bit more time in my schedule to post on Frugal Girlmet again!  First I’ll bring over recipes I had posted for a ministry blog I was contributing to – Girlfriends Coffee Hour – that never made it over to FG.  Then back to the kitchen (and then the keyboard) for more new entries here.  Let’s jump back in with…

Apple Spice Baked Oatmeal!  

As usual, I read over several recipes, made a few changes, and came up with something to call my own.  This was easy to make, and serves 6-8 for a hearty breakfast.  You can also make it the night before and reheat portions in the microwave.  This is a great way to start your day.  Bon apetit, my friends, and God Bless!

Apple Spice Baked Oatmeal

Ingredients:
   coconut oil or butter for greasing your baking dish
   2 apples, chopped (no need to peel)
   2 cups rolled oats
   1/2 cup brown sugar
   1 cup nuts, divided – Try walnuts or pecans.  I used whole almonds and let the kids crush them with my meat mallet!
   1/2 cup raisins
   1/2 teaspoon salt
   1 teaspoon baking powder
   1/2 teaspoon ground nutmeg
   1 1/2 teaspoons ground cinnamon
   2 eggs
   2 cups milk
   1 teaspoon vanilla extract
   1/2 stick butter, melted
   vanilla yogurt, to serve

Directions:
1.    Preheat oven to 325*F.  Grease your baking dish – mine was an oval dish, but you can use a deep 8″ or 9″ Pyrex.
2.   Spread the chopped apples in the bottom of your dish.
3.   Mix together the oats, sugar, 1/2 cup nuts, raisins, salt, baking powder, nutmeg, and cinnamon in a small bowl.
4.   In a large bowl, beat the eggs with the milk and vanilla.  Stir in the oat mixture, then stir in the melted butter.
5.   Pour the oat mixture over the apples and sprinkle with the remaining 1/2 cup of nuts.   Bake for about 45 minutes.  You want the oatmeal to be set and the top a bit golden and crusty.  Serve warm, with a big spoonful of vanilla yogurt on top.

Friday, August 15, 2014

Fruity Energy Bars


I’ve got a lot of hoops to jump through when it comes to making snacks for my girls.  I try to eat Paleo myself, and while I do serve my girls grains and legumes, I am always searching for recipes that rely on Paleo ingredients first.  Next, my older daughter is allergic to peanuts and tree nuts.  That eliminates a giant swath of choices in the Paleo category, which excludes grains in favor of nuts.  So for baking, that leaves me either coconut products (which we love and use often), or seeds, like pepitas or sunflower seeds.  I found a recipe that sounded good, reconfigured it for our needs, and now I proudly present:  Fruity Energy Bars!
In the grocery store, you’ll find half an aisle dedicated to energy and granola bars.  I love them and I love that, for the most part, they’re healthy and nutritious.  They are, however, kind of pricy – sometimes two or three dollars a bar!  And it seems like the ones with the fewer ingredients are even more expensive!  (I’m looking at you, Larabar!)  Now, these Fruity Energy Bars couldn’t be quicker – just three minutes in the food processor, and about half an hour to chill and firm up.  I think you could easily exchange the dried cranberries for another dried fruit – apples, apricots, raisins, prunes, or cherries would all work.  If you want to use nuts instead of sunflower seeds, try almonds or walnuts.  They do warm up very quickly and get soft, so keep them in the fridge until ready to eat.  Ready?  Get energized!

Fruity Energy Bars

Ingredients:
  • 1 cup pitted dates
  • 1 cup dried cranberries
  • 1 cup sunflower seeds (I used roasted and salted)
  • 1/4 cup unsweetened flaked coconut
  • 1/4 cup chocolate chips
Directions:
  1. Pour all the ingredients into the bowl of  your food processor.  Pulse to blend, then mix for about 3 minutes.  You can blend it all the way together and it will form a ball, but I took mine out before that so I could still have a little texture to the bars – kind of like the consistency of sticky sand.
  2. Line an 8×8 pan with plastic wrap, or grease with a little coconut oil.  Press the mixture into the pan and press down with the back of a big spoon.  Refrigerate for at least half an hour.  Cut into 1″x4″ bars.  Get energized and go be productive!

Friday, June 20, 2014

Crockpot Pork Tacos


If your idea of Mexican food is based on the dollar menu at Taco Bell, you are in for a treat!  Authentic Mexican food is easy to make at home and is quite healthy for you.  This Monday was Cinco de Mayo, so I made these Crockpot Pork Tacos, and they were muy delicioso!
In Mexico, and in authentic Mexican restaurants here in California, there is no shredded lettuce or cheddar cheese.  Tacos are simple and small and are often eaten on-the-go, so they’re not all covered in sauces or messy vegetables.  Chopped onions and cilantro are usually the only thing you’ll see, with a squeeze of lime.  I added avocado to mine because it pairs great with the pork.  It’s a traditional accompaniment to tacos and adds a creamy note to balance out the sharpness of the raw onions.
As far as the pork goes, I usually use a big shoulder roast, but you can use whatever pork roast you like.  The seasoning is simple here, but you can spice it up as much as you want.  Try adding a can of chipotles in adobo sauce for a smoky flavor, or a jar of salsa verde to the crockpot.
Finally, tacos are kind of like sandwiches.  You can make a thousand different kinds of sandwiches and all are tasty.  But if you only ever eat a turkey sandwich, you may never know how much you’d love a Reuben.  So:  if taco night at your house always means ground beef and diced tomatoes, you owe it to yourself to try something new.  Ready?  Vamanos!
Crockpot Pork Tacos
Ingredients:
  • 1 large pork roast, 2 or 3 pounds
  • 2 tablespoons salt
  • 1 teaspoon garlic powder
  • 1 teaspoon ground cumin
  • 1/2 cup fresh cilantro, roughly chopped
  • 1/2 red onion, diced
  • 1 or 2 avocados, sliced or diced
  • corn tortillas
  • lime or lemon wedges, to serve
Directions:
  1. Combine the salt, garlic powder, and cumin, and rub all over the outside of the pork roast.  Place in your crockpot and cook for 8 hours on low.  When done, the pork should pull apart easily.
  2. Warm up your tortillas:  I wrap a few tortillas in a clean, damp dish towel and microwave for 20 seconds.  If you try to use them cold, they’ll crack!
  3. Shred your pork with two forks, or chop roughly.  To serve, put about 1/3 cup of shredded pork in the center of a tortilla.  Sprinkle with cilantro, onion, and avocado.  Squeeze lime over taco.  Eat several.  Don’t wipe your hands on your pants!
If you have leftovers, and I always do, I usually skip the tortilla and just eat the pork, reheated in the microwave, covered in cilantro, onions, and avocado.  Skip the carbs, and squeeze lots of lime!

Shrimp with Cilantro Pesto


One thing that will bum me out, without fail, is seeing a wilted, mushy bunch of herbs that I didn’t get to in time.  Just makes me feel terrible.  So I had this nearly full bunch of cilantro in my produce drawer and no clue what to make with it.  Aha!  How about try it in pesto?  This recipe forShrimp with Cilantro Pesto was a big hit at dinner last night!
You can cook the shrimp however you like.  Here, we just pan-fried them quickly with salt and pepper, and let the pesto do the heavy lifting in the flavor category.  This comes together so quick it’s laughable.  Make the pesto whenever you like – even the day before – and keep in the fridge until you are ready to eat.  We ate this with roasted baby potatoes and roasted broccoli.  The pesto was especially delicious on the potatoes.  Try it and see!
Shrimp with Cilantro Pesto
Ingredients:
  • 1 large bunch cilantro
  • 1/3 cup toasted pepitas
  • 1 teaspoon minced garlic
  • juice of 1 lemon or lime
  • 1/3 cup olive oil
  • salt and pepper
  • 1 pound shrimp, peeled
  • 1 tablespoon olive oil
Directions:
  1. Wash and shake the cilantro and trim about half an inch off the bottom of the stems.  Place them in the bowl of a food processor.  Blend with the pepitas, garlic, lemon juice, and olive oil.  Taste and add salt and pepper to your liking.  Pour into a bowl and store in the fridge until ready to use.
  2. Prepare the shrimp: peel the shell off, remove the tail, and de-vein.  Season with salt and pepper and drizzle with olive oil.  Heat a pan on medium-high, and quickly sauté the shrimp.  They will only take about 2 minutes per side – don’t let them get tough and overdone!  Remove shrimp from pan to a plate and serve with the cilantro pesto (and a squeeze of lemon if you like.)

Grilled Caesar Salad


Before we go any further:  Yes, you grill the lettuce.  Say what?!  I first encountered this recipe at an Italian restaurant in our neighborhood a few years back.  It was a revelation—you can grill lettuce! And  instead of making it nasty and squishy, just a tiny bit of char adds so much flavor and texture as to change the whole dish!  Then I saw the idea again in a magazine last week and, that was it, I had to try it at home.  (Okay – I made my husband do the actual grilling.  But I supervised, I promise!)
The dressing comes together in a snap in the food processor (or you can do it old-school in a wooden salad bowl with a fork, but I find it is hard on my forearms!)  The only ingredient you may not have is anchovy paste.  It’s pretty cheap and lasts forever in your fridge, and it adds that “umami” flavor you can’t get anywhere else.  It’s also great in spaghetti sauce, if you’re worried you won’t make a lot of Caesar salad.  This dressing also calls for a raw egg yolk.  I would highly recommend buying the highest quality eggs you can find – check your local farmer’s market – or at least getting organic, free-range, or both.  (If you are immunosuppressed you could substitute a spoonful of store-bought mayonnaise, but it’s just not the same.)  Also, you’ll notice there are no croutons on my plate.  We almost never eat bread, but if croutons are your thing, go ahead and pile them on!
This salad was a side dish to a dinner of grilled steaks and grilled veggies.  Feel free to chop up some grilled chicken and make it a whole meal!  For a side dish, plan on one half of a head of lettuce per person.  If you are making it the main dish, serve a whole head of lettuce per person.  Curious?  Let’s go!
Grilled Caesar Salad
Ingredients:
  • 2 cloves garlic, peeled
  • 1 teaspoon Dijon mustard
  • 1/2 teaspoon Worcestershire sauce
  • 1 egg yolk
  • 1 teaspoon anchovy paste
  • juice of one lemon
  • 1/4 – 1/3 cup olive oil
  • 1 head romaine lettuce
  • croutons and grated parmesan cheese to serve
Directions:
  1. Prepare the dressing:  In a food processor, blend together the garlic, mustard, Worcestershire sauce, egg yolk, anchovy paste,  and lemon juice.  Blend in 1/4 cup of oil.  Taste to see if you like the consistency.  If you want it more diluted, add more oil.  Refrigerate until ready to serve.
  2. Prepare the lettuce:  Slice it vertically down through the core.  You have two long halves now.  Wipe with a dry paper towel.  The lettuce needs to be completely dry or else it will stick and wilt.  No washing it, no oiling it!  Place the lettuce on the grill, cut side down, for 2 minutes without moving it.  With tongs, take it off the grill and lay it grilled-side up on a plate.  Don’t cover it or it will get soggy.  Drizzle with dressing, and add croutons or grated cheese to serve.  Eat it now!

Crunchy Chopped Salad


I think this was originally a recipe from a South Beach Diet cookbook.  But I started making it so long ago, and have added and deleted ingredients over the years…so that I am not sure it’s the same one in the book.  That’s okay – it’s not about exact ingredients.  You can add or subtract as you like.  It’s about CRUNCH!  And that’s what you get in this Crunchy Chopped Salad!
I know that chips aren’t great for me.  I usually don’t crave them, and I make sure I don’t keep them in the house (because as a stay-at-home mom, you DO eat whatever is in the pantry!)  But sometimes you just get that urge for something kind of salty and crunchy.  I make this salad instead.  Is it the same?  Of course not!  (Otherwise I’d call it Doritos Salad!)  But this satisfying, fun-to-eat dish  scratches that itch for me, and maybe it will for you too.
If you need a break from lettuce, try this.  If you have lots of singleton vegetables in your crisper drawer, try this.  If you want something fresh and different for your next cookout, try this!
Crunchy Chopped Salad
(Serves four as a side dish)
Ingredients:
  • 6 baby carrots
  • 1 bunch radishes, trimmed
  • 3 stalks celery, trimmed
  • 2 Persian cucumbers, or one large cucumber
  • 1/2 red bell pepper
  • 1/2 yellow bell pepper
  • 2 green onions
  • 2 cloves garlic
  • juice of 1 lemon or lime
  • 2 or 3 drops of honey
  • salt and pepper
  • 1/4 to 1/3 cup olive oil
  • 2 avocados
Directions:
  1. Wash and trim all your veggies.  Cut them all into medium-small pieces.  This is up to you, but for example, I cut the peppers into 1/2″ square pieces.  The radishes, cucumbers, carrots, and celery all get sliced vertically, then cut into 1/4″ slices.  If you dice everything too small, you won’t get the crunchiness.  If you cut everything too large, you’ll only get one or two veggies on your spoon at a time.  Experiment and see what size you like best.  If you are using a large cucumber, you may want to peel off the waxy skin and scoop out the seeds.  I like Persians because they are thin-skinned and have very little squishy gel around the seeds.  Pile all your chopped veggies into a big bowl and toss.  Beautiful, right?
  2. In a little food processor, blend up your garlic, lemon juice, honey, salt and pepper, and 1/4 cup olive oil.  Taste and dilute with more oil if you like.
  3. To serve, dish the salad into a bowl and drizzle liberally with dressing.  For each serving, dice half of an avocado and place it on top (otherwise it gets smushed.)  Eat this salad with a big soup spoon so you get a little of each vegetable in every bite!
If you have leftovers, you can mix in a can of tuna the next day.  It’s wonderful!

Cranberry Orange Scones


If you have kids, you probably know what summer break is like:  trying to keep them busy and entertained without letting their brains turn to mush!  One of my favorite ways to do that is baking together.    I have my older girl (first grader now!) read the recipe out loud, and both girls love to stir and mix and pour ingredients.  Today’s group baking exercise?  Cranberry Orange Scones!
These are gluten-free, made with coconut flour.  If you’ve never tried it, I can’t recommend it highly enough.  For six big scones, you only need half a cup of coconut flour!  I like making treats for the girls that are single serving – that way there’s no arguing over whether the slice of bread is big enough, or having to share the last one.  These came together in a snap.  I made some changes, but the original recipe (found on the Elana’s Pantry website) directs you to mix all the ingredients in a food processor, and I’m sure that would have made the recipe go even faster!  But because my girls wanted to help, we mixed them by hand – dry ingredients in a large bowl, wet ingredients in a smaller bowl, and then mixed wet into dry.
Try these little heaven-scented beauties today!
Cranberry Orange Scones 
(Gluten-Free)     makes six large scones
Ingredients:
  • 1/2 cup coconut flour
  • 1/4 teaspoon salt
  • 1/4 teaspoon baking soda
  • 1/4 cup coconut oil or softened butter
  • 1/4 cup honey
  • 4 eggs
  • 1/2 cup dried sweetened cranberries
  • zest of one orange, plus the juice of half the orange
Directions:
  1. In a large bowl, blend together the flour, salt, and baking soda.
  2. In another bowl, beat together the coconut oil or butter, honey, and eggs.
  3. Mix the egg mixture into the flour mixture.  Stir in the cranberries, orange zest, and orange juice.
  4. On a Silpat mat or parchment paper, make six mounds of dough.
  5. Bake for about 15 minutes at 350*F.

Saturday, April 26, 2014

Crustless Kale Quiche


Talk about a tongue twister!  It’s worth the effort to say, and the little bit to make, because this Crustless Kale Quiche hits the spot.
I’ve only made this once … and I’ve already eaten almost half of it.  The kale adds a little bitterness and chew to what would otherwise be a run-of-the-mill spinach pie.  Nutmeg, currants, and pepitas add an almost sweet, Middle Eastern flavor profile.  The three eggs are just enough to combine the ingredients without becoming heavy or custardy like a regular spinach quiche.  Don’t get me wrong – a traditional spinach and swiss cheese quiche is wonderful, but this one is lighter, with an unexpected combination of flavors that will have you craving it again.
I ate this hot, and I ate it cold, cut right out of the fridge.  I ate this with a big slab of goat cheese on top and I ate it plain.  I’m going to eat more of it with dinner tonight and see if I can’t discover some new way to enjoy it.  If you want your greens, with a little extra zing, try this instead of a salad tonight!
Crustless Kale Quiche
Ingredients:
  • 1 pound bag of frozen chopped spinach
  • 1 large bunch of kale
  • 3/4 cup pepitas (or try pine nuts or sunflower seeds)
  • 1 tablespoon coconut oil (or butter) plus more for greasing the pie plate
  • 1 teaspoon chopped garlic (about 2 cloves)
  • 1/2 cup currants or raisins (next time I’m trying golden raisins!)
  • 1/8 teaspoon ground nutmeg
  • 1/2 teaspoon salt
  • 3 eggs
  • Goat cheese, to serve, if desired
Directions:
  1. Wash the kale and remove from the stem, tearing it into smaller-than-bite-sized pieces.  Saute on medium heat in a large pot with a lid.  Don’t add any extra water or oil – just the damp kale by itself.  Stir occasionally until it gets soft, about 15 minutes.  When it appears soft and has reduced in volume, pour in the bag of frozen spinach.  Stir to combine and replace the lid.  Cook on medium-low for another five minutes until the spinach is thawed.  Remove from the heat and let cool.
  2. Preheat the oven to 350*F.  While the spinach and kale are cooling, heat the coconut oil over medium and add the pepitas.  Stir frequently for 5 minutes, then add the garlic and currants.  Stir for another 3 minutes.
  3. Squeeze out as much water from the kale mixture as possible, then dump it into a large bowl.  Pour over the pepita mixture and combine.  Add nutmeg and salt.
  4. Beat 3 eggs well and mix into kale mixture.  Grease a pie plate, then fill with the kale mixture.  Smooth it down so you have a flat top.  Bake for 35 minutes or until not wet in the middle.  Serve warm or cold, with goat cheese or without.

Dijon Dill Green Beans


If I remember correctly, this is a recipe from the South Beach Diet book.   In any case, regardless of origin, these Dijon Dill Green Beans are delicious and healthy…and sure to please!
The Dijon dill dressing is very light and won’t hide the sweetness of the green beans.  I’ve used both dried dill and fresh, and they both taste great, so don’t fret or make a trip to the store if you only have dried.  Low-carb, low-cal, and tasty for sure, this veggie side will taste great with whatever main dish you’re making tonight!
Dijon Dill Green Beans
Ingredients:
  • 1 pound green beans, fresh or frozen
  • 2 tablespoons butter
  • 1 tablespoon Dijon mustard
  • 2 tablespoons chopped fresh dill (or one scant teaspoon dried dill)
  • salt and pepper to taste
  • squeeze of lemon, optional
Directions:
  1. Prepare the green beans:  (If using fresh, take off the ends and cut into 2-inch lengths.)  Steam or microwave the beans until they are still a little firm.
  2. While the beans are cooking, heat a large pan over medium and add the butter and dill.  Stir to keep the dill from burning and cook for a few minutes until the butter is bubbly and starting to brown.  Add the Dijon mustard and salt and pepper.
  3. Drain away any excess water from the beans, then add to the dill mixture.  Stir to coat the beans, then serve hot with a squeeze of lemon or another pinch of salt.
Leftovers?  I ate mine cold, with a can of tuna mixed in and (surprise!) a little more lemon juice squeezed over the top.  Yum!

Sunday, March 23, 2014

Roasted Vegetables with Buttermilk Herb Sauce


Did you have a fun and festive St. Patrick’s Day?  We didn’t do too much to celebrate.  (I have a little Irish in me, but no freckles!)   I did make a cabbage dish on Monday, leaving me with half a head of green cabbage.  I love roasting wedges of cabbage, but I wanted something a little more assertive, so I decided to make an herb dressing for them.  Add in some other roasted veggies, and I came up with this recipe for Roasted Vegetables with Buttermilk Herb Sauce.
Buttermilk is not something I grew up with, so I can’t really say much about it.  It does have a pleasantly sour taste that adds complexity to baked goods (think pancakes) and sauces.   If you add a lot of dill and pepper to this recipe, you’d have something very close to ranch dressing, but without all the chemicals and preservatives in bottled or packaged varieties.  I used parsley because that’s what I had but I’d like to try it next time with a big handful of tarragon.  If you grow your own herbs, this is the perfect canvas for trying new flavor combinations!
I served the sauce over roasted cabbage wedges and roasted golden beets.  Here is a list of other vegetables I think this would taste good on:  carrots, leeks, green beans, baked potatoes, and Brussels sprouts with bacon.  I served this with balsamic-glazed salmon last night, and you know what?  The sauce went great on the fish too!  I had a little sauce left over, so this morning I used it to make chicken salad for my husband’s lunch.  Find your own way with this delightfully green and springy sauce—start here!

Roasted Vegetables with Buttermilk Herb Sauce

Ingredients:
  • 4 beets
  • olive oil
  • 1/2 head green cabbage
  • 1/2 cup buttermilk
  • 3 tablespoons plain yogurt
  • 4 green onions
  • handful of fresh herbs:  use parsley, tarragon, dill, or a combination of these
  • 1 clove garlic or 1/2 teaspoon garlic powder
  • salt and pepper to taste
  • squeeze of lemon if desired (I used a big squeeze – okay, two big squeezes!)
Directions:
  1. Preheat oven to 400*F.  Prepare the beets for roasting:  Wash them and remove any greens from the top.  In a large rectangle of aluminum foil, place the beets, root tip facing up, in the middle.  Drizzle with a little olive oil, maybe a tablespoon total.  Wrap up the beets in the foil and place in a pie plate or Pyrex bowl.  Bake for one hour or until they give when you push on them.  Set aside to cool.
  2. While the beets are baking, prepare the cabbage: Cut out the core of the cabbage, then cut the cabbage into 4 wedges.  Place them on a foil-lined baking sheet and drizzle each wedge with about 1/2 teaspoon of olive oil.  After the beets have been in the oven for half an hour or so, add the cabbage.  Bake for about 15 minutes, then flip them over and bake again for about ten minutes.  (The time will vary depending on your oven, your cabbage, et cetera.  You want the cabbage to get golden and a little crispy at the edges, but not too dark!)
  3. While the vegetables are cooking, combine buttermilk, yogurt, green onions, herbs, and garlic in a food processor.  Taste it…need more garlic?  Go ahead!  Add salt and pepper and a squeeze of lemon if you like and blend again.  Taste to make sure it’s yummy, and then put in the fridge until ready to serve.
  4. Skin the beets:  once they are cool enough to handle simply slip the skins off with your fingers.  If you are using red beets, you may want to wear gloves, since they will turn your fingers pink!
  5. On each plate, lay down a wedge of cabbage and a beet cut into quarters.  Serve the hot veggies with the cold buttermilk herb sauce.