Saturday, April 26, 2014

Pickled Red Beet Eggs


I remember as a kid being very sad one Easter Sunday.  It was because, when I peeled one of the eggs I worked so hard to paint and dye and sticker-ize and bedazzle—all that work—the inside looked just like a plain, un-dyed egg!  (I hope my Mom told me that beauty is only skin deep.)  But later on in the day, I was delighted when my Mom took the big container of Pickled Red Beet Eggs out of the refrigerator! When you cut into one of these purple beauties – surprise! – the color went all the way through to the yolk!
This recipe is a great way to use up those hardboiled eggs.  I’ve found my kids like dyeing them way more than they like eating them, so I am usually guaranteed half a dozen eggs to use in this dish.  This is an old Pennsylvania Dutch recipe that came from my Mom and her mother, in Lancaster County, Pennsylvania.  You can adjust the ratio of vinegar to sugar, but I like how these are sweet-tart and firm.  Some people add very thinly sliced onions to the beet brine, and others add whole cloves.  I like them with just these 4 ingredients.
You’ll want to let these soak for at least 2 days.  I wouldn’t let them sit more than a week, but I really doubt they’ll last that long!  Make sure the eggs and beets are in a deep and narrow container so everything is submerged – if you go shallow and wide, your eggs won’t color evenly and you’ll have to rotate them at least 2 times a day.  So raid the kids’ Easter baskets and start pickling!


Pickled Red Beet Eggs
Ingredients:
  • 6 eggs
  • 2 cans sliced beets (not pickled beets)
  • 1/3 cup sugar
  • 1/2 cup vinegar (you can use white or apple cider)
Directions:
  1. In a sauce pan, place eggs in one layer.  Fill pan, covering the eggs with an inch of water.  Cook on high until a boil is just reached, then immediately remove from heat and cover with a lid.  Set a timer for 13 minutes.  When the time is up, drain the eggs and fill the pan with ice and water.  Let cool.
  2. Peel the cooled eggs and put them in a deep container with a lid.  Dump the two cans of beets and their juice into the container, followed by the sugar and vinegar.  Swirl around to dissolve.  Store in the refrigerator for at least 2 days, making sure the eggs are submerged (or turning them if they are not.)  Cut eggs in half and serve with beets.

Dijon Dill Green Beans


If I remember correctly, this is a recipe from the South Beach Diet book.   In any case, regardless of origin, these Dijon Dill Green Beans are delicious and healthy…and sure to please!
The Dijon dill dressing is very light and won’t hide the sweetness of the green beans.  I’ve used both dried dill and fresh, and they both taste great, so don’t fret or make a trip to the store if you only have dried.  Low-carb, low-cal, and tasty for sure, this veggie side will taste great with whatever main dish you’re making tonight!
Dijon Dill Green Beans
Ingredients:
  • 1 pound green beans, fresh or frozen
  • 2 tablespoons butter
  • 1 tablespoon Dijon mustard
  • 2 tablespoons chopped fresh dill (or one scant teaspoon dried dill)
  • salt and pepper to taste
  • squeeze of lemon, optional
Directions:
  1. Prepare the green beans:  (If using fresh, take off the ends and cut into 2-inch lengths.)  Steam or microwave the beans until they are still a little firm.
  2. While the beans are cooking, heat a large pan over medium and add the butter and dill.  Stir to keep the dill from burning and cook for a few minutes until the butter is bubbly and starting to brown.  Add the Dijon mustard and salt and pepper.
  3. Drain away any excess water from the beans, then add to the dill mixture.  Stir to coat the beans, then serve hot with a squeeze of lemon or another pinch of salt.
Leftovers?  I ate mine cold, with a can of tuna mixed in and (surprise!) a little more lemon juice squeezed over the top.  Yum!

Tuesday, April 8, 2014

Irish Soda Bread


For last week’s recipe, I needed a carton of buttermilk.  I still had quite a bit left, and I knew I wanted to use it all up, so I found a few recipes that fit the bill.  None, however, sounded as tasty as this one for Irish Soda Bread!
A “soda bread” is simply a quick bread that uses baking soda and /or baking powder to rise, as opposed to yeast.  That means you don’t need to wait for it to rise, or worry about the yeast being old and feeble (or killing it with water that is too hot … or not hot enough to wake it up … Have I mentioned lately I hate baking with yeast?!?!)  This recipe comes together in a food processor, but if yours isn’t big enough to fit all the ingredients, or you just like using a pastry cutter, you can certainly put some elbow grease into it and do it the old-fashioned way.
This recipe is based on a Martha Stewart recipe, but I made a few changes.  The biggest change is that, unlike regular soda bread that is kind of bland and dotted with raisins, this one has chopped currants throughout, so it is more of a currant-flavored bread.  Also, the original recipe called for caraway seeds, but I used anise seeds instead.  This bread keeps on the counter, wrapped tightly in plastic wrap and foil, for a few days.  Cut a big slice, cover it with butter, and match it up with your favorite coffee or tea.
Irish Soda Bread
Ingredients:
  • 4 cups flour
  • 1/4 cup sugar
  • 1 teaspoon salt
  • 2 teaspoons baking powder
  • 2 tablespoons anise seed
  • 4 tablespoon cold butter, cubed
  • 1 10-ounce box currants (or use 2 cups of raisins)
  • 1 1/2 cups buttermilk
  • 1 egg
  • 1 teaspoon baking soda
  • 3 tablespoons buttermilk
Directions:
  1. Preheat oven to 350*F.  Butter a large round Pyrex baking dish, all the way to the top.
  2. In the bowl of a large food processor, blend together the flour, sugar, salt, baking powder, and anise seed.  Add the cold butter cubes and pulse to blend.  Add in the currants and blend again.
  3. In a large bowl, beat together the buttermilk, egg, and baking soda.  Add this to the food processor and blend again until thoroughly mixed.  It will be wet and sticky!
  4. Scoop the bread dough into the buttered Pyrex dish and smooth into a mound.  With a brush or the back of a spoon, brush the top with the 3 tablespoons of buttermilk.  Bake for 70-80 minutes, or until a toothpick comes out clean.

Sunday, March 23, 2014

Roasted Vegetables with Buttermilk Herb Sauce


Did you have a fun and festive St. Patrick’s Day?  We didn’t do too much to celebrate.  (I have a little Irish in me, but no freckles!)   I did make a cabbage dish on Monday, leaving me with half a head of green cabbage.  I love roasting wedges of cabbage, but I wanted something a little more assertive, so I decided to make an herb dressing for them.  Add in some other roasted veggies, and I came up with this recipe for Roasted Vegetables with Buttermilk Herb Sauce.
Buttermilk is not something I grew up with, so I can’t really say much about it.  It does have a pleasantly sour taste that adds complexity to baked goods (think pancakes) and sauces.   If you add a lot of dill and pepper to this recipe, you’d have something very close to ranch dressing, but without all the chemicals and preservatives in bottled or packaged varieties.  I used parsley because that’s what I had but I’d like to try it next time with a big handful of tarragon.  If you grow your own herbs, this is the perfect canvas for trying new flavor combinations!
I served the sauce over roasted cabbage wedges and roasted golden beets.  Here is a list of other vegetables I think this would taste good on:  carrots, leeks, green beans, baked potatoes, and Brussels sprouts with bacon.  I served this with balsamic-glazed salmon last night, and you know what?  The sauce went great on the fish too!  I had a little sauce left over, so this morning I used it to make chicken salad for my husband’s lunch.  Find your own way with this delightfully green and springy sauce—start here!

Roasted Vegetables with Buttermilk Herb Sauce

Ingredients:
  • 4 beets
  • olive oil
  • 1/2 head green cabbage
  • 1/2 cup buttermilk
  • 3 tablespoons plain yogurt
  • 4 green onions
  • handful of fresh herbs:  use parsley, tarragon, dill, or a combination of these
  • 1 clove garlic or 1/2 teaspoon garlic powder
  • salt and pepper to taste
  • squeeze of lemon if desired (I used a big squeeze – okay, two big squeezes!)
Directions:
  1. Preheat oven to 400*F.  Prepare the beets for roasting:  Wash them and remove any greens from the top.  In a large rectangle of aluminum foil, place the beets, root tip facing up, in the middle.  Drizzle with a little olive oil, maybe a tablespoon total.  Wrap up the beets in the foil and place in a pie plate or Pyrex bowl.  Bake for one hour or until they give when you push on them.  Set aside to cool.
  2. While the beets are baking, prepare the cabbage: Cut out the core of the cabbage, then cut the cabbage into 4 wedges.  Place them on a foil-lined baking sheet and drizzle each wedge with about 1/2 teaspoon of olive oil.  After the beets have been in the oven for half an hour or so, add the cabbage.  Bake for about 15 minutes, then flip them over and bake again for about ten minutes.  (The time will vary depending on your oven, your cabbage, et cetera.  You want the cabbage to get golden and a little crispy at the edges, but not too dark!)
  3. While the vegetables are cooking, combine buttermilk, yogurt, green onions, herbs, and garlic in a food processor.  Taste it…need more garlic?  Go ahead!  Add salt and pepper and a squeeze of lemon if you like and blend again.  Taste to make sure it’s yummy, and then put in the fridge until ready to serve.
  4. Skin the beets:  once they are cool enough to handle simply slip the skins off with your fingers.  If you are using red beets, you may want to wear gloves, since they will turn your fingers pink!
  5. On each plate, lay down a wedge of cabbage and a beet cut into quarters.  Serve the hot veggies with the cold buttermilk herb sauce.

Friday, March 14, 2014

Italian Tuna Wraps


I love it when a plan comes together!  I was hungry at lunchtime yesterday, so I opened my pantry.  I stared at the shelf for a good minute…eyes glazing over.  ”There’s got to be something here, some combination of flavors that will fill and delight me” I thought.  And bingo!  Inspiration struck and I made these Italian Tuna Wraps.
Okay, this is pretty much just tuna salad in a lettuce wrap.  But the addition of white beans makes it filling, contributes a creamy texture, and ups the fiber.  A handful of chopped parsley adds freshness.  This recipe serves two for lunch.  Or just do what I did, and put it in the fridge for tomorrow’s lunch.  It will still taste great the next day!
Italian Tuna Wraps
Ingredients:
  • 1 can of tuna
  • 1 can of white beans
  • juice of 2 lemons
  • 1 tablespoon olive oil
  • salt and pepper
  • pinch of garlic powder
  • 1/4 cup roughly chopped parsley
  • Boston lettuce leaves (or other lettuce leaves of choice) for wrapping
Directions:
  1. Drain the can of tuna and put it in a large bowl.  Drain the beans, rinse them in a strainer and then add them to the tuna.
  2. Toss the tuna mixture with the lemon juice and olive oil.  Season with salt, pepper, and garlic powder; toss again.  Add parsley and toss.
  3. To serve, wash and shake dry the lettuce leaves, and place a large spoonful of tuna in the lettuce.  Wrap and eat.  Couldn’t be easier!

Friday, March 7, 2014

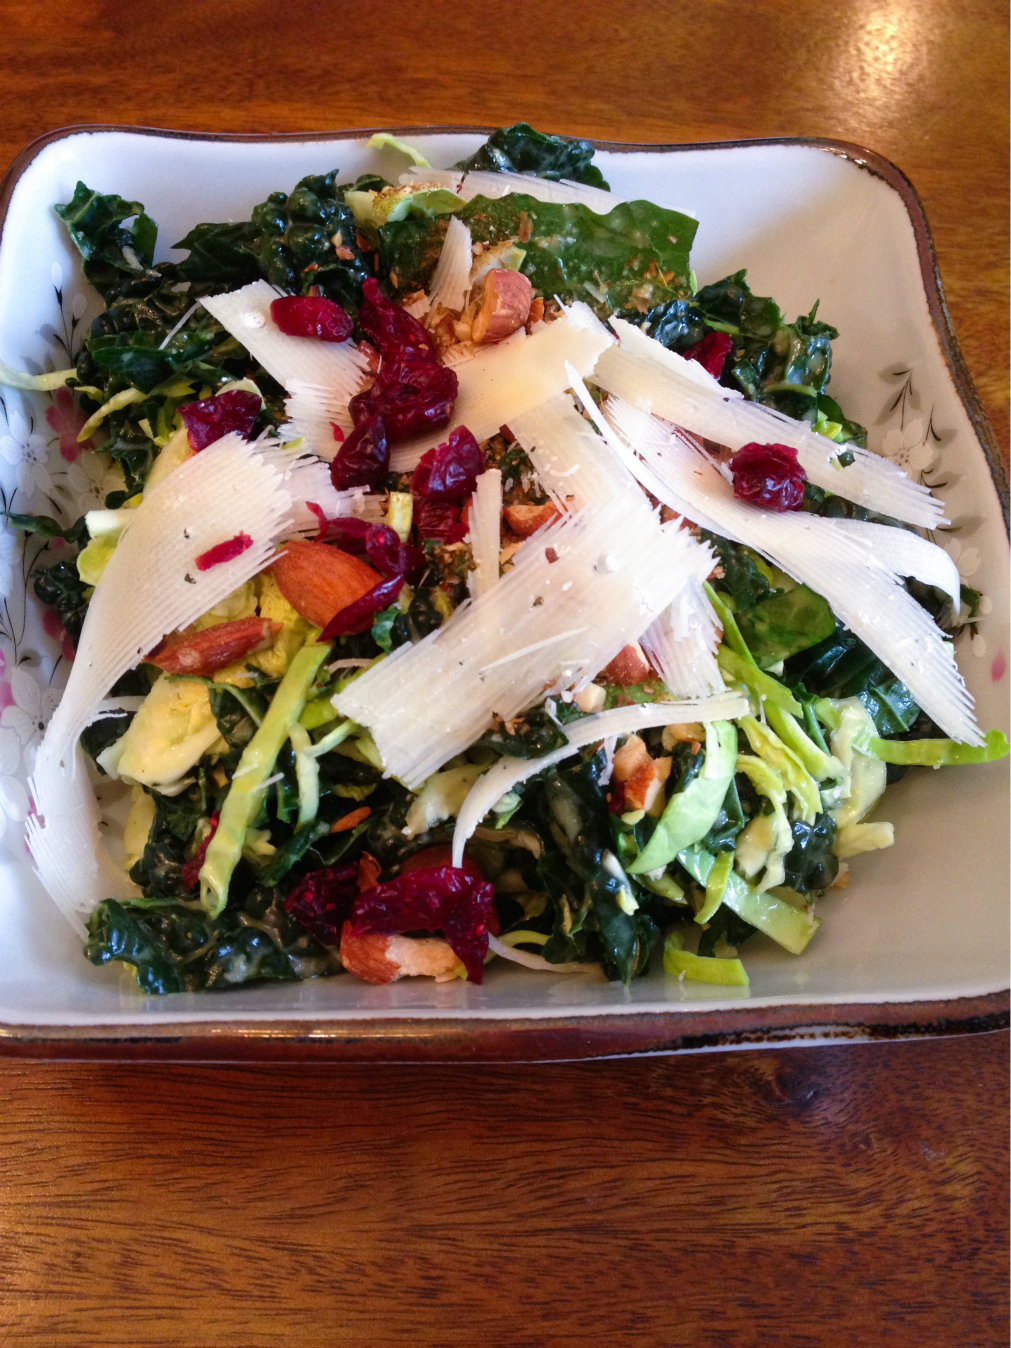
Brussels Sprout and Kale Salad


Kale and Brussels Sprouts Salad Resize
Now you all know I love a good salad.  I will eat a salad for breakfast – in fact, I’m finishing this big bowl of Brussels Sprouts and Kale Salad right now, with my morning coffee!  Raw Brussels sprouts—for breakfast?!  Yes indeed!
I found this recipe on the Bon Appetit website, which I tweaked to my liking.  The best thing about this salad, aside from the fact that it tastes good, is that it is so hearty.  I made it last night, had some for dinner, and it’s still good this morning!  But because it’s so sturdy, you’ll want to keep the nuts, fruit, and cheese separate until you’re ready to eat it.  You can sub any dried fruit you like for the cranberries:  cherries, blueberries, golden raisins, and diced dried apricot would be delicious too.  And if you don’t have toasted almonds, substitute pecans, walnuts, or hazelnuts.  Check it out, and report back with your chosen combination of flavors!
Brussels Sprouts and Kale Salad
Ingredients:
  • 1 bunch Tuscan kale (also called dinosaur or lacinato kale)
  • 1/2 pound large Brussels sprouts
  • 1 shallot (or 1/4 red onion)
  • juice of one large lemon
  • 1/3 cup olive oil
  • 1/2 teaspoon honey
  • to serve:  almonds, dried cranberries, and Parmesan cheese
  • salt and pepper
Directions:
  1. Prepare kale:  Strip the leaf off the thick stem, then soak the leaves in cold water to remove any dirt.
  2. While the kale is soaking, prepare the Brussels sprouts:  cut off the stem end and any brown or wilted leaves.  Slice in half lengthwise, and lay down flat on the cut side.  Thinly slice each sprout half to create shreds.  Place shredded sprouts in a very large bowl.
  3. Dry the kale.  Grab a handful and sort of wad it up, then run your knife through the kale to shred it.  Add to the sprouts in the  bowl.
  4. In a small food processor, blend together the shallot, lemon juice, olive oil, and honey.
  5. Pour over the kale and mix with your hands.  I mean get in there!  Massage the dressing into the kale, squeezing it to soften everything up and get the dressing into all the sprouts and kale.
  6. To serve:  Dish salad into a bowl.  Take a handful of almonds and crush with a knife or in a mortar and pestle – just crack them lightly, you don’t need to pulverize them.  Add the cracked nuts and cranberries to the salad, then shred some Parmesan to go on top.  I shaved the block of Parmesan with my vegetable peeler, but you don’t have to do that if you don’t want.  Season with salt and pepper and serve.

Friday, February 28, 2014

Mondo Coconut Shrimp


Yes, MONDO!  With four, count ‘em, FOUR different coconut products, you too can make your favorite appetizer from that restaurant you go to with your girlfriends!  Mondo Coconut Shrimp are really quite easy to make, and, a fun and tasty appetizer for a party.
You’ll want to use BIG shrimp for this recipe—the larger the better.  I found  some 13-15 count shrimp on sale, and they worked really well.  If you are using smaller shrimp, decrease your cooking time so you don’t make these guys all tough and rubbery.  I coated these in both sweetened AND unsweetened coconut.  Feel free to use one or the other if you don’t have both.  I was going to make this recipe just with the unsweetened kind, but I found a cup of sweetened coconut in my freezer and decided to use it up – and I’m glad I did!
To be  honest, these are fantastic with just some salt sprinkled on top when they come off the stove.  I took a photo of them with a lemon slice, and found out they didn’t even need that to be delicious!  So make these for friends, or as part of a funky dinner, and go MONDO!
MONDO Coconut Shrimp
Ingredients:
  • 1 pound large shrimp, shelled and deveined
  • 3 eggs
  • 1 cup coconut flour
  • 1 cup sweetened shredded coconut
  • 1 cup unsweetened shredded coconut
  • 1 teaspoon curry powder
  • coconut oil, for frying
  • salt for serving
Directions:
  1. Set up a breading station.  In the first bowl, beat the 3 eggs with a tablespoon of water.  In the second bowl, pour in the coconut flour.  In the third bowl, mix together the two coconut shreds and the curry powder.
  2. Start breading:  Dip a shrimp into the egg, then the coconut flour, then back into the egg, and then the coconut shreds.  Place on a plate while you complete the breading.
  3. In a large non-stick frying pan, heat one heaping teaspoon of coconut oil over medium heat.  When  hot, carefully add the breaded shrimp.  You’ll probably have to do this in at least two batches.  Let them cook for about six minutes, then flip and cook again for another five minutes.  Watch your heat here – you want it medium to medium-low, so that the shrimp cooks evenly and the breading doesn’t burn before the shrimp are done.
  4. Remove cooked shrimp to a plate and immediately sprinkle with kosher or sea salt.  Add another teaspoon of coconut oil  to the pan, if necessary, and cook the next batch.  Serve hot!
I texted my husband a photo of the shrimp and he said, “Oooh, looks yummy!” so I saved him some.  Unfortunately, they aren’t as nice the second time around.  They still taste great, but you can’t get them crispy on the outside a second time.  That means Carpe Diem – Gather ye rosebuds while ye may – and eat your shrimp while they’re hot.