Wednesday, February 1, 2017

Spinach Pakoras with Royal Dip


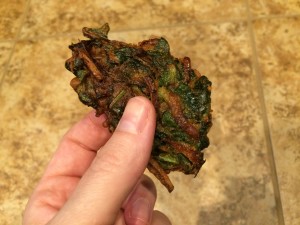
I first had these delicious veggie fritters at a stand at the farmer’s market.  I’d never seen them before, but it was love at first bite!  I swore I’d have to find a way to make them at home – and I did!  Spinach Pakoras with Royal Dip are healthy, tasty, vegetarian and gluten-free too!  These Indian snacks are eaten with a minty yogurt dip and are a popular street food.

The only ingredient that may be a bit tough to find is chickpea flour.  Also called gram flour or besan flour, it’s just dried garbanzo beans ground powder-fine.  I made it at home, and while it took a bit of time because my food processor is wimpy, it worked very well!  If you do grind your own, you will need to sift it through a fine sieve, and return any pebbles to the food processor for a finer grind.  After that, it’s smooth sailing.  Bob's Red Mill has a really good packaged chickpea flour, and is available at most grocery stores.  If you’re lucky enough to have an Indian grocery store nearby, stop in and buy some chickpea flour – and whatever else catches your eye and tempts your nose!
Spinach Pakoras with Royal Dip

Ingredients:
  • 1 cup Greek yogurt
  • 1 clove garlic, finely minced
  • 1 tablespoon cilantro, finely minced
  • 1 tablespoon mint, finely minced
  • 1 cup chickpea flour
  • 1 teaspoon curry powder
  • 1/2 teaspoon  ground fennel seeds
  • 2 tablespoons rice flour (or use more chickpea flour, or use regular flour)
  • 2 cups fresh spinach or other hearty greens (mustard, collard, kale), chopped
  • 1/2 onion, cut into very thin strings
  • 1/4 teaspoon salt
  • 1/4 cup water (may use more or less)
  • oil for frying:  grapeseed, coconut, peanut, or vegetable oil
Directions:
  1. Make the Royal Dip:  stir together the yogurt, garlic, cilantro, and mint.  Cover and refrigerate.
  2. Mix together the chickpea flour, curry powder, fennel, and rice flour in a large bowl.
  3. Mix in the spinach and onion. Stir to combine.
  4. Add about 3 tablespoons of water and stir.  Mix it all very well.  You don’t want a thin batter – you just want the flour to be wet and coating the veggies.  Add a bit of water until you make a thick batter.
  5. Heat the oil over a medium burner and drop the pakora batter in by the tablespoonful.  Try to flatten them out a bit so they are pancake-shaped as opposed to spherical.  Cook for about 3 minutes until crispy, then flip and cook the other side.
  6. Remove pakoras to a paper towel-lined plate and sprinkle with a bit of salt.  Serve hot with the Royal Dip.


Tuesday, January 31, 2017

Sausage & Mushroom Stuffed Shells with Pumpkin Sage Béchamel


Whoo, that’s a long title!  And I’ll be honest – this does take a bit of time to prepare.  But if you have an extra hour on a Sunday night and want to make a delicious dinner with generous portions that you can eat the whole week through and not stop loving – try these Sausage and Mushroom Stuffed Shells with Pumpkin Sage Béchamel.
I was going to post my take on this recipe, since I made a few changes for my family, but I didn’t take careful note of my measurements. Food blogger fail!  So I’m just giving you the recipe I found at A Beautiful Bite.  I do want to note that I switched out cottage cheese for ricotta in this recipe, and it worked great.  Just buzz it in the food processor for a few seconds and it’s indistinguishable from the pricier ricotta.  Also, I ran out of sage and I had to garnish with parsley.  In any case, this recipe was a big hit, and it reheats well, so we’ll be seeing this again in our house.
 Sausage and Mushroom Stuffed Shells with Pumpkin Sage Béchamel
(Recipe Courtesy of A Beautiful Bite)
Ingredients:
  • 1 pound pasta shells, cooked al dente
  • 32-ounce ricotta cheese (or use cottage cheese)
  • 2/3 cup Parmesan cheese, grated
  • 1 egg
  • 1 teaspoon salt
  • ground pepper to taste
  • 1 pound Italian sausage (I used sage breakfast sausage)
  • 2 large yellow onion, diced
  • 2 cloves garlic, minced
  • 2 cups fresh mushrooms, sliced
  • 4 fresh sage leaves, thinly sliced
  • 3 tablespoons butter
  • 2 tablespoons flour
  • 3 cups milk
  • 1 cup pumpkin puree
  • 1 cup Greek yogurt
  • 1/2 cup Parmesan cheese, grated
  • 1/3 cup ricotta cheese
  • 6 fresh sage leaves, thinly sliced
  • 1 1/2 teaspoon salt
  • pepper to taste
  • 1/2 cup Parmesan cheese, grated for topping (I skipped this)
Directions:
  1. In a large mixing bowl, combine ricotta cheese, Parmesan, egg, salt and pepper.  Set aside.
  2. Cook shells according to directions on box.  Drain and let cool.
  3. While shells are cooking, brown sausage in a large skillet.  Remove from skillet and place meat on a paper towel to drain.  Reserve 1 tablespoon of the fat to cook the onions in.
  4. Cook onions in fat over medium heat until translucent.  Add garlic and cook for just a minute.  Add mushrooms and sage and cook for another four to five minutes.  Remove from heat and add cooked sausage.   Allow to cool for several minutes.
  5. Stuff shells with ricotta mixture, then top with sausage mixture.  Place shells in a 9×13 baking dish.  Set aside while you prepare béchamel sauce.
  6. In a large heavy pot, melt butter over medium heat.  Add flour and cook, stirring, for several minutes.  Add milk, pumpkin, yogurt, Parmesan, and ricotta.  Cook for a few minutes to thicken.  Add sage, salt and pepper.
  7. Pour béchamel over shells.  Top with extra grated Parmesan.  Bake at 350*F for forty minutes.

Friday, January 27, 2017

Apple Spice Baked Oatmeal


I have returned!  It’s a new year, and I’ve decided to make a bit more time in my schedule to post on Frugal Girlmet again!  First I’ll bring over recipes I had posted for a ministry blog I was contributing to – Girlfriends Coffee Hour – that never made it over to FG.  Then back to the kitchen (and then the keyboard) for more new entries here.  Let’s jump back in with…

Apple Spice Baked Oatmeal!  

As usual, I read over several recipes, made a few changes, and came up with something to call my own.  This was easy to make, and serves 6-8 for a hearty breakfast.  You can also make it the night before and reheat portions in the microwave.  This is a great way to start your day.  Bon apetit, my friends, and God Bless!

Apple Spice Baked Oatmeal

Ingredients:
   coconut oil or butter for greasing your baking dish
   2 apples, chopped (no need to peel)
   2 cups rolled oats
   1/2 cup brown sugar
   1 cup nuts, divided – Try walnuts or pecans.  I used whole almonds and let the kids crush them with my meat mallet!
   1/2 cup raisins
   1/2 teaspoon salt
   1 teaspoon baking powder
   1/2 teaspoon ground nutmeg
   1 1/2 teaspoons ground cinnamon
   2 eggs
   2 cups milk
   1 teaspoon vanilla extract
   1/2 stick butter, melted
   vanilla yogurt, to serve

Directions:
1.    Preheat oven to 325*F.  Grease your baking dish – mine was an oval dish, but you can use a deep 8″ or 9″ Pyrex.
2.   Spread the chopped apples in the bottom of your dish.
3.   Mix together the oats, sugar, 1/2 cup nuts, raisins, salt, baking powder, nutmeg, and cinnamon in a small bowl.
4.   In a large bowl, beat the eggs with the milk and vanilla.  Stir in the oat mixture, then stir in the melted butter.
5.   Pour the oat mixture over the apples and sprinkle with the remaining 1/2 cup of nuts.   Bake for about 45 minutes.  You want the oatmeal to be set and the top a bit golden and crusty.  Serve warm, with a big spoonful of vanilla yogurt on top.

Friday, March 6, 2015

Easy Chicken Mole

Easy Chicken Mole
The first time I had mole (say moe-lay) it was at a small but very well-regarded Mexican restaurant in Los Angeles, La Loteria.  I had heard of mole poblano before and decided to take a chance.  Que rico!  What a glorious taste!  It was rich, a tiny bit spicy, a little bitter, and a little fruity.  It was really a savory fiesta in my mouth.  However, when I went home with the intent to find out more about this magical dish and how to make it, all the recipes I saw were 40 ingredients long and took days to make.  No me gusta – I just didn’t have time to mess with that.  So after some more research, I came up with this recipe – my Easy Chicken Mole!
The two ingredients that most moles share to give them such depth of flavor are dried chiles and chocolate.  Really!  Buy the darkest chocolate you can find.  You can use baker’s unsweetened chocolate, but that will make it bitter, and you’ll probably want to bring it back around with some added honey or brown sugar.  I used bittersweet chocolate, 63% cacao.  I think it worked well, and next time I might even add a little more.
As far as the chiles go, it gets a little confusing.  Oftentimes a chile will have one name when it’s fresh and a different name when it’s dried (I guess kind of like grapes vs. raisins.)  To be honest, I think I bought ancho chiles, but I’m not sure – there were two kinds and neither were labeled!  You want chiles that are a very dark reddish-brown—like the color of dried blood—and about fist-sized.  I used two but I may use three or even four next time.  I removed the seeds, and that’s where the heat resides, so you only get the smoky, fruity flavor of the chiles and not the spiciness.
Try this recipe.  If you’ve never had mole, this is a great place to start.  If you are a mole aficionado, go ahead and tweak my recipe to get the taste you like.  Either way, I bet you’ll say, Que sabor!  (Or if you don’t habla espanol, ‘So tasty!’)
Easy Chicken Mole
Ingredients:
  • 2-4 dried chiles (use ancho, pasilla, or guajillo)
  • 2 onions, chopped
  • 4 tablespoons butter
  • 4 cloves garlic, minced
  • 1/4 cup sesame seeds (or use pepitas, peanuts, or almond butter)
  • 1/4 cup dark chocolate chips
  • 1/4 cup raisins
  • 1/2 teaspoon ground cinnamon
  • 1/2 teaspoon salt
  • 1/2 teaspoon dried oregano
  • 2 cups chicken stock
  • 1/2 cup brewed coffee
  • 2 slices bread
  • 2 pounds boneless, skinless chicken thighs (or use breasts, up to you!)
  • diced avocado, cilantro, sesame seeds to serve
  • rice or tortillas to serve, optional
Directions:
  1. Put the dried chiles in a bowl and cover with boiling water.  Put a plate over the bowl and let the chiles soak for about 15 minutes.  When they have softened, remove the stem and seeds and roughly chop.  Discard the stem, keep some seeds if you want some heat.
  2. While the chiles are soaking, cook the onion in the butter in a very large pot or Dutch oven.  Stir to make sure they don’t burn.
  3. Add the chopped chiles, minced garlic, and sesame seeds.  Stir and cook for 3 minutes.
  4. Add the chocolate, raisins, cinnamon, salt, and oregano.  Stir to combine and cook for another 2 minutes.
  5. Add the chicken stock and coffee.  Crumble in the bread.  Cover the pot with a lid and simmer for 10 minutes.
  6. CAREFULLY transfer sauce to a blender and blend until pretty smooth.  You could use an immersion blender, too.
  7. Return the sauce to the pot and add the chicken thighs.  Tuck them into the sauce and stir.  Make sure the chicken is covered in sauce, then cover with the lid.  Let simmer for about 25 minutes.
  8. The chicken is done when you can shred it with forks.  To serve, ladle the chicken and lots of mole into a bowl.  Garnish with lots of avocado, cilantro and sesame seeds.  You can also eat this in tortillas – just serve with less sauce if you are making tacos.  You can also serve it over rice to soak up the sauce.

Monday, September 15, 2014

Sriracha Butter


Are you a griller?  Admittedly, I am not.  The two things I avoid, as far as cooking goes, are baking with yeast (it hates me and refuses to cooperate) and the grill.  I love it when my husband or my Dad grill up something, and I will prepare everything for the fire—as long as I am not the one doing it.  Why?  I don’t know.  I’ve never done it and I guess I’m intimidated.  So even though we live in sunny Southern California, we eat pan-fried steaks much more often than grilled.  Sound boring?  Not when you serve them with Sriracha Butter!
This is a Martha Stewart recipe I found in the back of her magazine this summer.  If you haven’t tried it yet, Sriracha is a brand of hot sauce that is beloved for it’s spicy, fruity bite.  If you don’t have Sriracha handy, try another hot sauce – just not something that’s got too much fire!  The other ingredient that makes this butter special is the anchovies.  I didn’t have any, but I always have a tube of anchovy paste in my fridge (for this Caesar salad recipe and this Green Goddess dressing).  HINT: Any time you see an anchovy fillet in a recipe, you can substitute one inch of anchovy paste.
We ate this on sirloin steaks that were very lean, so the added flavor and fat from the butter were a welcome addition.  My spice-shy daughter loved it and even put some on her steamed cauliflower!  Ready to try it?  Let’s go!
Sriracha Butter
Ingredients:
  • 1 stick butter, softened
  • 2 anchovy fillets, minced (or use a 2-inch squeeze of anchovy paste)
  • 1 tablespoon Sriracha or other chili sauce
  • 1 clove garlic, minced
  • salt to taste (I didn’t add any extra salt to mine)
Directions:
  1. Mash the softened butter together with the anchovies, Sriracha, and garlic.  Taste to see if you want any more salt.  Refrigerate until ready to use.  Melt on steaks, cooked vegetables, or potatoes.

Sunday, August 31, 2014

Tarragon Green Bean Salad


Green beans – get ‘em while they’re hot!  Or cold.  They’re in season now, so green beans are cheap and plentiful.  My husband likes them best splashed with olive oil and roasted in the oven, but sometimes you don’t want to heat up the house.  For a yummy, summery green bean dish that’s delicious warm or cold, try this Tarragon Green Bean Salad!
Fresh herbs are a joy, and this recipe uses parsley, tarragon, and green onions.  Technically this may be a green goddess salad dressing, and it IS wonderful on a salad with fresh tomatoes.  You will have enough dressing left over to do just that!  Make the dressing while the beans are cooking and this recipe is ready in a snap.  Let’s go!
Tarragon Green Bean Salad
Ingredients:
  • 1 pound fresh green beans
  • 2 cloves garlic
  • 1-inch squeeze of anchovy paste or one small anchovy fillet (you can sub soy sauce if you must)
  • 1 fist full of parsley
  • 1 fist full of tarragon leaves
  • 2 green onions
  • 2 tablespoons mayonnaise
  • 2 tablespoons yogurt (or sub sour cream)
  • juice of 1 lemon (or sub tarragon vinegar, if you’re fancy!)
Directions:
  1. Prep the green beans:  cut off tops and tails and cut the beans into 1-inch pieces.  Put the beans in a covered dish with some water and cover.  Microwave for about six minutes.  You want the beans tender-crisp.
  2. While the beans are steaming, make the dressing:  Blend all the rest of the ingredients in a food processor.  It doesn’t have to be homogeneously smooth, but you don’t want to bite down on a big chunk of garlic!
  3. To serve:  Toss the beans in half of the dressing.  Serve warm, or refrigerate until ready to serve.  It’s great cold too, especially with grilled meats.  Serve the leftover dressing with salad and tomatoes, or use it as a dip for carrots and peppers.

Friday, August 15, 2014

Fruity Energy Bars


I’ve got a lot of hoops to jump through when it comes to making snacks for my girls.  I try to eat Paleo myself, and while I do serve my girls grains and legumes, I am always searching for recipes that rely on Paleo ingredients first.  Next, my older daughter is allergic to peanuts and tree nuts.  That eliminates a giant swath of choices in the Paleo category, which excludes grains in favor of nuts.  So for baking, that leaves me either coconut products (which we love and use often), or seeds, like pepitas or sunflower seeds.  I found a recipe that sounded good, reconfigured it for our needs, and now I proudly present:  Fruity Energy Bars!
In the grocery store, you’ll find half an aisle dedicated to energy and granola bars.  I love them and I love that, for the most part, they’re healthy and nutritious.  They are, however, kind of pricy – sometimes two or three dollars a bar!  And it seems like the ones with the fewer ingredients are even more expensive!  (I’m looking at you, Larabar!)  Now, these Fruity Energy Bars couldn’t be quicker – just three minutes in the food processor, and about half an hour to chill and firm up.  I think you could easily exchange the dried cranberries for another dried fruit – apples, apricots, raisins, prunes, or cherries would all work.  If you want to use nuts instead of sunflower seeds, try almonds or walnuts.  They do warm up very quickly and get soft, so keep them in the fridge until ready to eat.  Ready?  Get energized!

Fruity Energy Bars

Ingredients:
  • 1 cup pitted dates
  • 1 cup dried cranberries
  • 1 cup sunflower seeds (I used roasted and salted)
  • 1/4 cup unsweetened flaked coconut
  • 1/4 cup chocolate chips
Directions:
  1. Pour all the ingredients into the bowl of  your food processor.  Pulse to blend, then mix for about 3 minutes.  You can blend it all the way together and it will form a ball, but I took mine out before that so I could still have a little texture to the bars – kind of like the consistency of sticky sand.
  2. Line an 8×8 pan with plastic wrap, or grease with a little coconut oil.  Press the mixture into the pan and press down with the back of a big spoon.  Refrigerate for at least half an hour.  Cut into 1″x4″ bars.  Get energized and go be productive!